When it comes to extracting the last ounce of performance from your car, suspension tuning is the secret language of speed. Every curve, bump, and corner of a U.S. race track tells your suspension how to behave. If it’s properly dialed in, the car becomes an extension of you — predictable, stable, and brutally fast. But if it’s off, even the most powerful engine can’t save a bad lap time. In this comprehensive guide, we’ll unpack the art and science of suspension setup for U.S. circuits, with practical insights for tuners and track-day enthusiasts.
Understanding the Core of Suspension Setup
Your suspension system isn’t just about springs and shocks. It’s a balancing act between grip, weight distribution, aerodynamics, and driver feedback. The goal is to maximize tire contact with the asphalt while keeping the car stable through acceleration, braking, and cornering.
Before we dive into advanced techniques, remember this: suspension tuning starts with the fundamentals. A good setup begins with a solid chassis alignment, correct ride height, and properly balanced corner weights.
 Corner Weights: The Foundation of Handling Balance
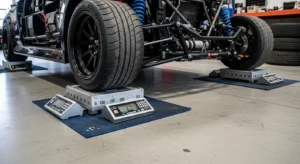
Corner weighting — also known as cross-weight balancing — is the process of ensuring that each wheel carries the appropriate share of the vehicle’s total weight. This affects how evenly the tires grip and how predictably the car responds during transitions.
1. What Are Corner Weights?
Each corner of your vehicle supports a different load depending on where the engine, driver, and fuel tank sit. When you set up corner weights, you aim to achieve near-perfect balance, so the car reacts consistently in both left and right turns.
2. Why It Matters for U.S. Tracks
Most U.S. circuits, like Laguna Seca, Road America, and VIR, feature a mix of left- and right-hand corners. A well-balanced car won’t “favor” one side, which translates to smoother corner entry and more consistent lap times. At oval or asymmetric tracks (e.g., Daytona or Charlotte Motor Speedway), setups are intentionally unbalanced to optimize for one direction.
3. How to Adjust Corner Weights
- Start with the car at racing weight — including driver and fuel.
- Place the car on corner scales with suspension settled.
- Adjust spring perches (coilovers) to shift load diagonally until cross-weight equals 50%.
That 50% number means your diagonal weights (LF + RR and RF + LR) are equal. A perfect cross-weight results in neutral handling and even tire wear.
4. Pro Tip for Club Racers
If you frequently race at tracks that turn primarily one direction, you can slightly bias the corner weights to that side — a technique used in NASCAR and dirt oval setups. Just make sure to test and document each adjustment carefully.
Springs: Balancing Comfort and Control
Springs are the backbone of suspension behavior. They determine how much the car rolls, dives, and squats. Choosing the right spring rate is one of the most critical — and misunderstood — aspects of suspension setup.
1. Understanding Spring Rates
Spring rate refers to the force required to compress the spring by one inch (in lb/in). A stiffer spring resists compression more, keeping the car flatter through corners. Softer springs allow more movement, improving grip over bumps but at the cost of body control.
2. How to Choose the Right Spring Rates
- Track Type: Smooth, fast U.S. tracks (like COTA or Watkins Glen) favor stiffer rates for high-speed stability. Rougher or club tracks (like Willow Springs) need more compliance.
- Vehicle Weight: Heavier cars require higher rates to control motion.
- Tire Grip: High-grip tires can handle stiffer setups without losing traction.
- Aero Load: Cars with significant downforce can benefit from stiffer springs to prevent bottoming out under aerodynamic load.
3. Linear vs. Progressive Springs
Linear springs offer predictable response throughout their compression, which makes them ideal for track use. Progressive springs change rate as they compress — softer at first, then firmer — making them popular for street/track hybrids.
4. Fine-Tuning Spring Balance
Start with manufacturer or team baseline data. Once corner weights are set, adjust spring rates front-to-rear to control pitch and roll. For example:
- Too much understeer: Soften front springs or stiffen rear.
- Too much oversteer: Stiffen front springs or soften rear.
 Dampers (Shocks): Controlling Motion, Not Just Soaking Bumps
If springs set the boundaries of suspension movement, dampers dictate the timing. Their job is to control how fast the suspension compresses and rebounds, keeping the tires glued to the surface.
1. Compression and Rebound Explained
Compression damping manages how quickly the shock absorbs energy when hitting a bump or transferring load. Rebound damping controls how fast it returns to its original position. Too much rebound, and your tire “skips.” Too little, and it oscillates uncontrollably.
2. Setting Up Adjustable Dampers
- Start with the manufacturer’s baseline settings.
- Use two-way adjustable dampers for independent compression and rebound tuning.
- Test in small increments — one or two clicks per change.
- Focus on consistency, not comfort.
High-end coilovers offer three- or four-way adjustment, separating low- and high-speed damping. This allows you to tune ride quality without affecting chassis control during rapid transitions.
3. Testing on Track
U.S. tracks like Road Atlanta or Sonoma Raceway are perfect test grounds. Record lap data, tire temps, and driver feedback. The key is to isolate one variable at a time. For example, if the car understeers in mid-corner bumps, slightly soften front compression and retest.
Anti-Roll Bars: The Unsung Hero of Balance
Anti-roll bars (sway bars) connect the suspension on each side of the car to control body roll. Adjusting their stiffness fine-tunes cornering balance:
- Stiffer front bar: Reduces body roll but can increase understeer.
- Stiffer rear bar: Improves rotation but may induce oversteer.
Track setups often pair spring and bar adjustments together. For instance, if you soften springs to improve grip, a stiffer bar can recover some lost roll control.
Ride Height and Rake: Aerodynamics Meets Suspension
Ride height affects both mechanical grip and aerodynamic performance. Lowering the car reduces the center of gravity and improves stability, but go too low, and you risk bottoming out or upsetting suspension geometry.
Rake — the difference between front and rear ride height — influences aerodynamic balance. A slight front-down rake increases downforce but can shift weight too far forward under braking.
For example, a setup used at Watkins Glen might have 10mm front rake to maximize stability in high-speed turns. Meanwhile, a track like Laguna Seca with elevation changes benefits from more clearance to prevent scraping under compression.
Alignment: The Final Fine-Tune
Once the suspension hardware is dialed, proper alignment makes the difference between “pretty good” and “perfect.”
- Camber: Negative camber improves corner grip but increases tire wear. Street/track cars often run –2.0 to –3.0 degrees front, slightly less in the rear.
- Toe: Toe-out improves turn-in response but hurts stability on straights. Toe-in improves stability but can cause sluggish steering.
- Caster: More positive caster improves self-centering and high-speed stability but increases steering effort.
 Using Data to Refine Setup
Modern tuners and racers rely on data logging systems to quantify changes. Track maps, lap overlays, and tire temperature readings help identify if an adjustment truly improved performance or just felt different.
Start by correlating subjective feedback (“car feels twitchy mid-corner”) with objective data (tire temps, steering angle traces). Platforms like Motorsport.com provide professional setup insights and race engineering references that you can apply to your own tuning.
Common Mistakes to Avoid
- Making too many changes at once.
- Ignoring tire pressures — they can undo all your suspension tuning.
- Using track-day setups for street driving without adjusting ride height or damping.
- Skipping proper corner-weight checks after changing springs or coilovers.
Case Study: Suspension Tuning for Laguna Seca
Laguna Seca’s infamous Corkscrew and elevation shifts make it a great example. A successful setup balances compliance with control:
- Spring rates: Slightly softer rear to maintain traction uphill.
- Dampers: Softer compression for downhill braking zones.
- Anti-roll bars: Medium stiffness to prevent excessive roll through Turn 2.
- Camber: –2.5 front, –2.0 rear to handle long sweepers.
With this approach, the car stays neutral across Laguna’s unique elevation and braking demands, giving drivers confidence to push harder every lap.
How to Document and Replicate Your Setup
Every great setup starts with notes. Use a tuning log to record:
- Track name, weather, and tire type.
- Spring and damper settings.
- Ride height and alignment values.
- Driver feedback and lap data.
Building a personal setup database helps you make faster adjustments when switching between U.S. tracks. Over time, patterns emerge, showing which changes deliver the best results.

 Corner Weights: The Foundation of Handling Balance
 Dampers (Shocks): Controlling Motion, Not Just Soaking Bumps
 Using Data to Refine Setup